Sorry the quality's not the best, but it should get the point across.
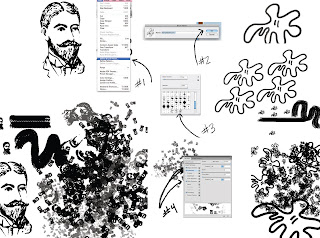
Mike and I were talking about how to make a brand spanking new brush rather than editing one from photoshop. This is a really quick tutorial on how I've found out how to do that.
It all really starts with your image. Make sure it's easy to translate at different sizes. Don't use low quality, because when it sizes up, it'll be grainy. Consider line weight too if it has that. Make sure that only what you want to be the brush is on the image. Otherwise you'll have odd extra bits added on.
Go to Edit>Define Brush Preset. It'll pop up a window that gives you a brush at the size your image was drawn/pasted into photoshop.
Then use the Brush Panel to make them scatter, weight sensitive, etc. Otherwise you'll have a line of blotches/mustachioed gentlemen.
You can use this same technique for textures and such.
Hope it helped! :D


4 comments:
Yes, brushes are fun to make. Most often you end up tweaking a brush so that the image marks appear very close together or rotated. Open shapes with ragged edges tend to work best at imitating real-media brushes.
Wow, I feel honored. Thanks for the tutorial! It was very helpful.
Custom brushes really are amazing.
I was just thinking...are you even taking the class anymore? O_o I figured Gahl dropped...just curious.
Post a Comment